
Connect a Xero organisation, add its connector URL to an MCP client, and review proposed writes before they reach Xero.
What you need before you start
Connect Xero in 7 steps
Works the same on your phone or your computer.
Open Settings > AI connections
Sign in to Invio, go to Settings, then the MCP tab. You'll see three tabs - Invio, Xero, and MYOB (marked "Soon" - not clickable yet). This guide covers the middle one.
Choose your permissions, then click Connect Xero
Before you go anywhere near Xero, Invio's own picker lists every permission it can ask for - invoices, journals, reports, projects and your identity are ticked by default; recording payments and payroll are off unless you turn them on. Untick anything you do not want asked for. You can always come back and change this later from Settings > MCP > Xero, without losing your organisations or connector URLs. Clicking Connect takes you to Xero's own sign-in and consent screen at login.xero.com - not a page inside Invio - asking for exactly what you ticked, nothing more. If you're not already signed in to Xero, it asks you to sign in first.
Tick which organisation(s) to share
Xero lists every organisation your login can reach and lets you tick more than one before you continue - you do not need to repeat this whole flow once per entity. Xero also shows you, on its own screen, exactly what Invio is asking permission for (see the box below).
Land back on Settings, connected
Xero sends you straight back to Invio. The Xero card now lists every organisation you just authorised, each with its own "Connected" badge. Forgot one, or want to add a new entity later? Click Connect another organisation any time - it runs the same Xero screen again and adds to your list without touching what's already connected.
Generate your connector URL
Still on the Xero card, give it a label if you like (e.g. "My Claude") and click Generate connector URL. Read the next section before you do this - the URL it gives you is shown exactly once.
Add it to your AI client
Claude: click Open in Claude right after generating - it pre-fills the connector for you. ChatGPT (Developer mode): turn on Developer mode in Settings, then add the same URL as a custom connector. Any other MCP client: paste the URL wherever it asks for a custom/remote MCP server.
Ask a question first
Try something read-only, like "what's outstanding in [organisation name]?" - reads run straight through, no approval needed. Then try asking it to draft an invoice or change a contact, so you see the approval step (below) happen for real before you rely on it.
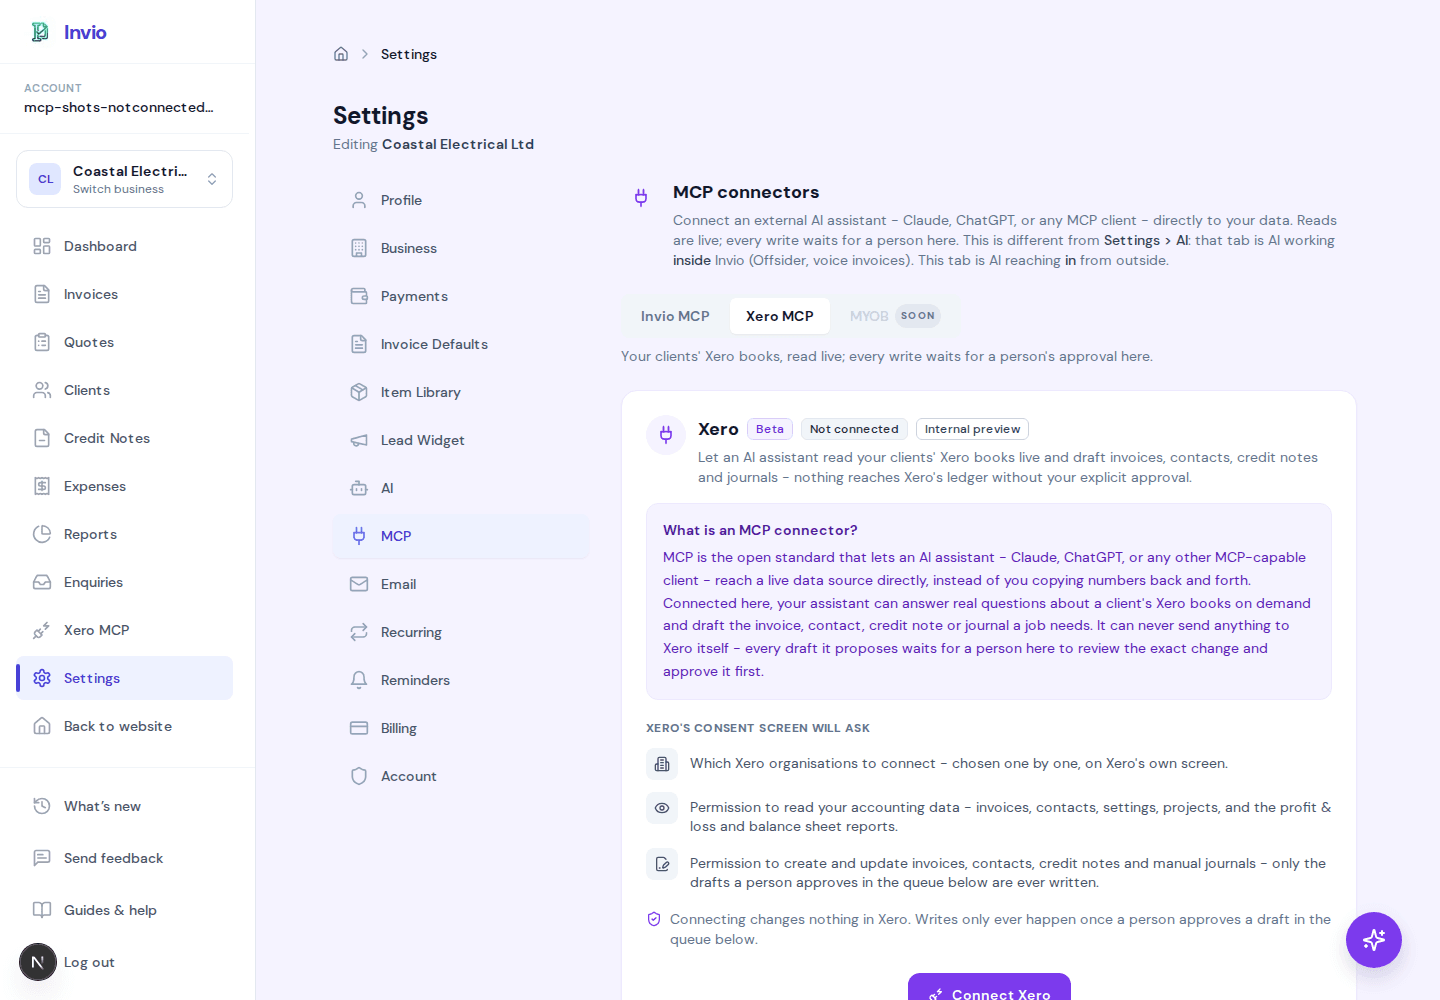
Settings → AI connections → Xero, before you have connected anything.
What each permission means
You choose these on Invio's own picker before Xero's screen ever appears - Xero then only ever asks for what you picked, in the same plain English.
Xero's own consent screen goes here
This is Xero's screen, at their login, not ours - we cannot screenshot it from inside Invio. What it asks for is listed below, in plain English.
Your identity (required)
Your name and email from Xero, and which organisations and contacts your assistant can see - the minimum every connection needs to work at all. Cannot be unticked.
Invoices, quotes, credit notes (on by default)
Read AND write - the connector can read these and, once you approve a draft, create or change one. This is the permission approval exists to control. You can untick it.
Manual journals (on by default)
Read AND write journal entries, drafted for approval the same way. You can untick it.
Reports (on by default)
Read-only - profit & loss and balance sheet. Nothing here ever changes a report. You can untick it.
Projects (on by default)
Read-only, and only useful if you use Xero Projects. You can untick it.
Record payments (off by default)
Read and write, but ONLY if you tick it - unlike everything above, this is off unless you turn it on. Recording a payment goes through the same approval queue as every other change - nothing is applied to Xero until you approve it there, and even then a payment cannot be undone from Invio once approved, only from inside Xero itself.
Payroll, read only (off by default)
Read payroll data - employees, pay runs, timesheets and settings. Australia, New Zealand and the UK. Off unless you tick it.
Payroll: make changes (off by default, requires Payroll read)
Draft timesheets and pay runs, and post a pay run - every change waits for your approval the same as everything else. Recording leave is not built yet, only read (Payroll, read only, above already covers checking a leave balance). Invio does not build a way to undo a posted pay run, so treat approving one with the same care as approving a payment - check it in Xero if you need to be sure. Only tickable once Payroll, read only is ticked too - the picker enforces this for you.
By default, Invio does not ask for anything to do with payments or bank transactions - the "Record payments" permission above is off unless you turn it on yourself, so we do not ask a customer, or their accountant, to hand over more of their ledger than they have chosen to.
For the full picture of what each permission grants, who on your team can approve, what Invio stores, and how to disconnect - see What Invio's Xero connector can see, and what it can never touch.
Run several Xero organisations?
You can tick more than one organisation on Xero's own screen the first time through (step 3 above) - there's no need to run the whole flow once per entity. Once you're back in Invio, the Xero card lists every organisation you authorised, each with its own badge.
Need to add another one later - a new entity, or one you skipped the first time? Click Connect another organisation on the Xero card any time. It runs Xero's consent screen again and adds to your list; it never touches or re-authorises what's already connected.
If you ever connect more organisations than your plan covers, the ones you connected earliest are the ones that stay usable - your AI assistant will tell you plainly if you ask about one that's currently over your plan's limit, rather than silently failing or guessing.
Your connector URL - shown once
When you click Generate connector URL, Invio creates a new, private link for this connection and shows it to you exactly once, in an amber box right on the Xero card. Copy it there and then - refresh the page, or navigate away, and it is gone for good (though your connection to Xero itself is unaffected - you would just need to generate a new URL).
Generating a connector genuinely returns two different things - an internal id, and the connector URL. Only the URL is what you paste into Claude, ChatGPT or any other client; the URL's last segment IS the actual key. On the Settings screen you will only ever see the URL (never a bare id next to it, on purpose), so following the screen itself avoids this - but it's worth knowing, because this exact mix-up has caught someone holding full context before: they copied the id, not the URL, and nothing worked until they went back and copied the right field.
Treat the URL like a password - anyone who has it can act as this connection inside Invio's guardrails (reads, and drafts that still need your approval - see below). You can see every connector URL you've ever generated in the "Active connectors" list below the amber box (label and dates only, never the URL itself again), and revoke any one of them instantly.
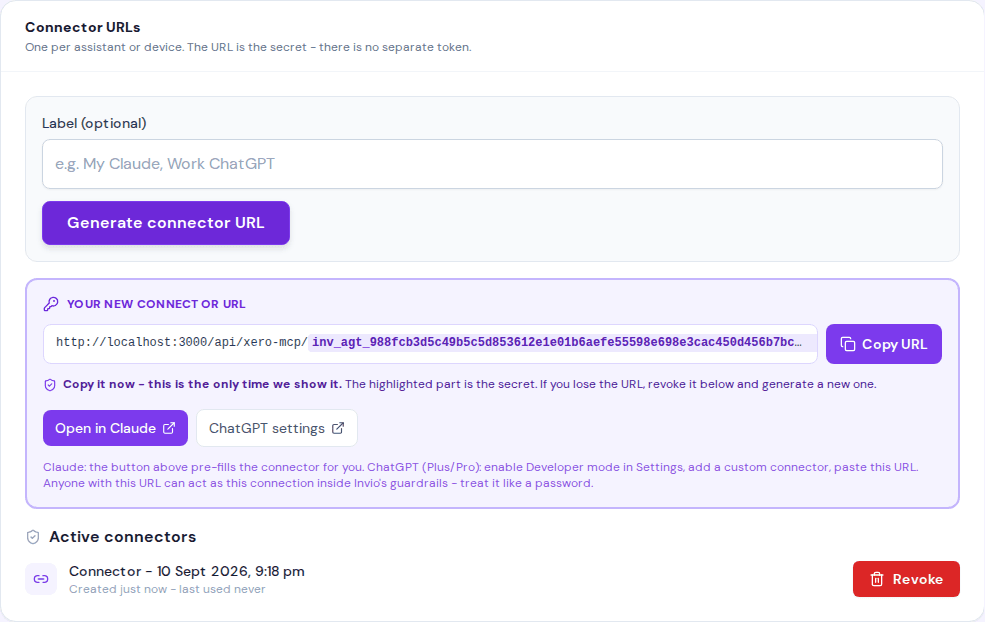
The amber box only ever shows the real, freshly generated URL - never a placeholder.
Add it to Claude, ChatGPT, or anything else
A connector you add in claude.ai shows up automatically in Claude Code only when Claude Code is signed in with that same claude.ai subscription account - not when it is running on an API key, a long-lived setup token, or a third-party provider like Amazon Bedrock or Google Cloud. If you are signed in that way, run /mcp in a Claude Code session, pick the Xero connector from the list, and approve it there too - until you do, the tools are listed but calling one is refused. If you are on an API key or another provider instead, you will need to configure the connector for Claude Code directly rather than relying on it to appear from claude.ai.
If you added this connector to Claude's desktop app before the connector was actually live, that attempt is left behind as a stale entry that never connects, sitting next to the working one you added afterwards. It does not fix itself. Open Claude's connector settings, find the older, non-working Xero entry, and remove it - keep the one that actually connects.
How approving a write actually works
Reads - invoice lists, a single invoice, contacts, profit & loss, balance sheet, who owes you money - run straight through. There is nothing to approve for a question.
A write - your assistant drafting a new invoice, or proposing a contact change - is different by design. It does not reach Xero. Invio holds it as a pending change and it appears in Settings → AI connections, under the Xero card, showing the exact organisation, a plain-language summary, and the exact payload Invio would send. You choose Approve & send to Xero or Reject.
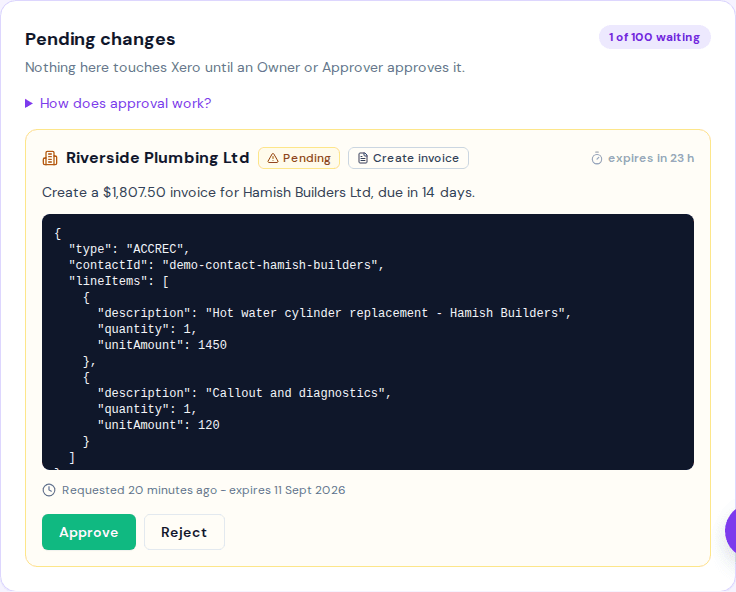
A real pending change - the exact payload, not just a description of it.
Approving asks you to confirm a second time, because it is irreversible the moment it happens - once you approve, Invio sends it to Xero and tells you plainly whether it succeeded. Rejecting throws the proposal away with a lighter confirmation; it was never going to change anything either way. If you leave a proposal untouched, it expires 24 hours after your assistant drafted it, and nothing happens to your Xero organisation on its own.
For an invoice, your approval here is normally the only approval anyone gives: it arrives in Xero already approved and ready to send, with a due date filled in. If you would rather look it over in Xero first, ask for that and it arrives as a draft there instead. Either way, Invio never emails the invoice to your customer - sending it is a separate step you take in Xero yourself, and this connector has no way to do it for you.
About that due date: if you do not give one, Invio uses your own default payment terms from Xero, and the approval card tells you which terms it used and what date they produced, so you can catch a wrong one before you approve. If your organisation has no default payment terms set, your assistant asks you for a due date rather than leaving it blank - Xero will not let anyone approve an invoice that has none.
If a write ever fails to reach Xero, or is still in the middle of sending, it does not just vanish - it shows up in a separate "Needs your attention" section on the same screen until you've seen it.
Approving from the chat: your assistant can now say "approve that" (or "reject it") itself, right here in the conversation, instead of you opening Settings. But only once you have clearly said so, in your own words - it will not infer approval from context, and it will never approve or reject anything speculatively. It still writes to Xero through the exact same approval this screen already uses, the exact same row, whichever way you act on it - Settings → MCP → Xero is unaffected and always shows everything either way.
What you can ask once connected
Three real questions against Xero's own Demo Company (NZ) sample data - not a mockup.
These are Xero's own Demo Company (NZ) sample figures - Xero publishes that organisation as fictional data, not a real customer's books. The first two answers were produced by the live connector on 10 September 2026; the third shows what the connector actually returns for a drafted invoice.
Name the organisation when you ask something new, the way the first and third questions above do. With only one organisation connected, Invio uses it automatically; with more than one, it asks which one rather than guessing. A follow-up that reasons over an answer already on screen, like the middle question above, does not need to repeat it.
Prefer to watch it? Watch a real session.
Disconnecting Xero
Two levels, depending on what you actually want to stop:
Settings → AI connections → Xero → find it under "Active connectors" → Revoke. That one AI client loses access immediately; your Xero connection and any other connector URLs you've generated are untouched.
Settings → AI connections → Xero → Disconnect Xero. Every connector loses access to every organisation immediately, and anything sitting in your approval queue is cancelled. Your Invio invoicing data - invoices, clients, quotes - is not affected either way.